
1. 设计思路
全志D1芯片fel模式下会初始化好串口为115200波特率,所以我们的思路是封装好串口发送数据接口来使用即可,而无需再去设置串口的波特率等寄存器,从而简化代码。
1.1 启动文件
启动文件为entry.S,这个文件中主要就是初始化好栈地址,然后跳转到c语言实现的init接口执行。
.section .text
.global _entry
_entry:
    la sp, __stack_start
    li a0, 4096
    csrr a1, mhartid
    addi a1, a1, 1
    mul a0, a0, a1
    add sp, sp, a0

    call init
loop:
    j loop
其中__stack_start这个符号是在内核的链接脚本文件中定义的,表示栈底地址,这个在后面会看到。启动栈模式设置的大小为4KB,设置完成后直接跳转Init执行,代码逻辑很简单。
1.2 调试打印
串口驱动直接使用之前开发全志D1 SylixOS时串口驱动代码,稍作修改即可。
#include "common.h"
#include "regs.h"

/*********************************************************************************************************
  寄存器偏移
*********************************************************************************************************/
#define RBR                   0x0
#define THR                   0x0
#define IER                   0x4
#define LCR                   0xc
#define USR                   0x7C

void uart_putc(char c)
{
    //  若 FIFO 不满就填入数据,否则等待
    while (!(read32(UART0_BASE + USR) & (1 << 1)));

    write32(c, UART0_BASE + THR);
}

void uart_getc(char *addr)
{
    *addr = read8(UART0_BASE + RBR);
}

int uart_rx_empty(void)
{
    return (!(read32(UART0_BASE + USR) & (1 << 3)) ? 1 : 0);
}

void uart_rx_int_enable(void)
{
    write32(read32(UART0_BASE + LCR) & ~(1 << 7), UART0_BASE + LCR);
    write32((1 << 0), UART0_BASE + IER);
}

void uart_puts(char *msg)
{
    char c;

    if (!msg) return;

    while ((c = *msg)) {
        uart_putc(c);
        msg++;
    }
}
封装好串口接口后还需要实现内核调试打印的接口printk,这个接口的实现参考xv6。
#include <stdarg.h>
#include "types.h"
#include "console.h"

static char digits[] = "0123456789abcdef";

// 打印整形数据
static void print_int(int xx, int base, int sign)
{
    char buf[16];
    int i;
    unsigned int x;

    if(sign && (sign = xx < 0))
        x = -xx;
    else
        x = xx;

    i = 0;
    do {
        buf[i++] = digits[x % base];
    } while((x /= base) != 0);

    if(sign)
        buf[i++] = '-';

    while(--i >= 0)
        cons_putc(buf[i]);
}

// 打印指针数据
static void print_ptr(u64 x)
{
    int i;
    cons_putc('0');
    cons_putc('x');

    for (i = 0; i < (sizeof(u64) * 2); i++, x <<= 4)
        cons_putc(digits[x >> (sizeof(u64) * 8 - 4)]);
}

// 打印数据.目前支持 %d, %x, %p, %s.
void printk(char *fmt, ...)
{
    va_list ap;
    int i, c;
    char *s;

    if (fmt == 0)
        return;

    va_start(ap, fmt);
    for(i = 0; (c = fmt[i] & 0xff) != 0; i++) {
        if(c != '%'){
            cons_putc(c);
            continue;
        }

        c = fmt[++i] & 0xff;
        if(c == 0)
            break;

        switch(c){
        case 'd':
            print_int(va_arg(ap, int), 10, 1);
            break;

        case 'x':
            print_int(va_arg(ap, int), 16, 1);
            break;

        case 'p':
            print_ptr(va_arg(ap, u64));
            break;

        case 's':
            if((s = va_arg(ap, char*)) == 0)
                s = "(null)";

            for(; *s; s++)
                cons_putc(*s);
            break;

        case '%':
            cons_putc('%');
            break;

        default:
            // Print unknown % sequence to draw attention.
            cons_putc('%');
            cons_putc(c);
            break;
        }
    }
}
2. 内核链接脚本
内核链接脚本kernel.ld参考xv6,添加一个栈段在启动时使用。
OUTPUT_ARCH( "riscv" )
ENTRY( _entry )

SECTIONS
{
  . = 0x40000000;

  .text : {
    *(.text .text.*)
    . = ALIGN(0x1000);
    PROVIDE(etext = .);
  }

  .rodata : {
    . = ALIGN(16);
    *(.srodata .srodata.*) /* do not need to distinguish this from .rodata */
    . = ALIGN(16);
    *(.rodata .rodata.*)
  }

  .data : {
    . = ALIGN(16);
    *(.sdata .sdata.*) /* do not need to distinguish this from .data */
    . = ALIGN(16);
    *(.data .data.*)
  }

  .bss : {
    . = ALIGN(16);
    *(.sbss .sbss.*) /* do not need to distinguish this from .bss */
    . = ALIGN(16);
    *(.bss .bss.*)
  }

  .stack (NOLOAD) : {
    . = ALIGN(16);
    PROVIDE (__stack_start = .);

    . += 128 * 1024;

    . = ALIGN(16);
    PROVIDE (__stack_end = .);
  }

  PROVIDE(end = .);
}
- 链接地址先设置为0x40000000,这时全志D1内存基址。
- 栈段的起始和结束地址分别用__stack_start和__stack_end这两个符号表示,其会在栈寄存器设置时使用到。
3. Makefile
Makefile文件参考xv6并作一些简化,由于我们需要直接将OS镜像下载到内存中执行,所以我们不能使用elf格式的镜像,因为fel不支持,fel需要使用bin格式的镜像文件,所以使用objcopy将elf格式文件转换为bin镜像使用。
K = kernel
U = user

OBJS = \
    $K/entry.o \
    $K/init.o \
    $K/uart.o \
    $K/console.o \
    $K/print.o

# cross compiler and flag set
TOOLPREFIX = riscv64-unknown-elf-
CC = $(TOOLPREFIX)gcc
AS = $(TOOLPREFIX)as
LD = $(TOOLPREFIX)ld
OBJCOPY = $(TOOLPREFIX)objcopy
OBJDUMP = $(TOOLPREFIX)objdump

CFLAGS = -Wall -Werror -O -fno-omit-frame-pointer -ggdb
CFLAGS += -MD
CFLAGS += -mcmodel=medany
CFLAGS += -ffreestanding -fno-common -nostdlib -mno-relax
CFLAGS += -I.
CFLAGS += -fno-stack-protector
CFLAGS += -fno-pie -no-pie

LDFLAGS = -z max-page-size=4096

all: $K/kernel

# compile kernel
$K/kernel: $(OBJS) $K/kernel.ld
    $(LD) $(LDFLAGS) -T $K/kernel.ld -o $K/kernel.elf $(OBJS)
    $(OBJCOPY) -O binary $K/kernel.elf $K/kernel.bin
    $(OBJDUMP) -S $K/kernel.elf > $K/kernel.asm

clean:
    rm -f *.tex *.dvi *.idx *.aux *.log *.ind *.ilg \
    */*.o */*.d */*.asm */*.sym \
    $K/kernel.elf $K/kernel.bin
目前的Makefile还是比较简单的,输入“make”命令即可编译出kernel.bin来使用。
4. 运行测试
开发板连接otg口和debug口到电脑上,打开win终端和串口终端,在win终端上输入“xfel ddr d1”命令来初始化全志D1的ddr内存,成功后在串口终端上会有ddr初始化的一些打印:
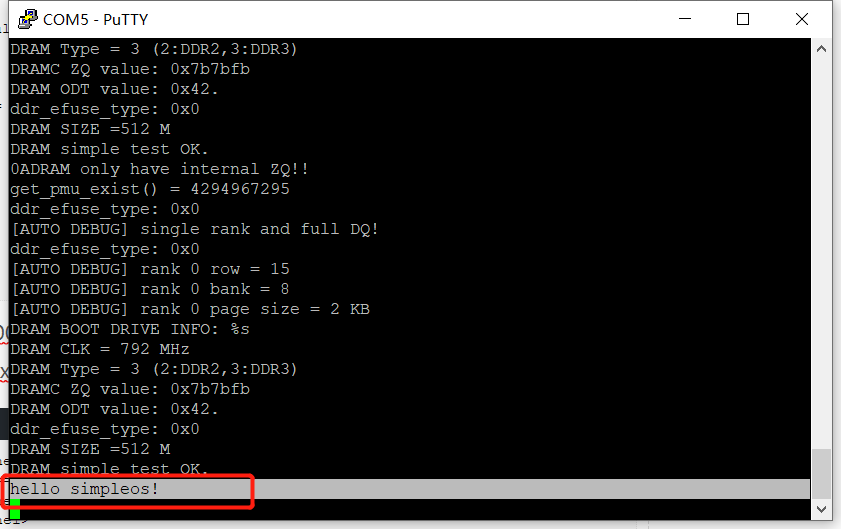
DRAM only have internal ZQ!!
get_pmu_exist() = 4294967295
ddr_efuse_type: 0x0
[AUTO DEBUG] single rank and full DQ!
ddr_efuse_type: 0x0
[AUTO DEBUG] rank 0 row = 15
[AUTO DEBUG] rank 0 bank = 8
[AUTO DEBUG] rank 0 page size = 2 KB
DRAM BOOT DRIVE INFO: %s
DRAM CLK = 792 MHz
DRAM Type = 3 (2:DDR2,3:DDR3)
DRAMC ZQ value: 0x7b7bfb
DRAM ODT value: 0x42.
ddr_efuse_type: 0x0
DRAM SIZE =512 M
DRAM simple test OK.
接着输入“xfel write 0x40000000 .\kernel.bin”命令将kernel.bin这个系统镜像下载到内存基址0x40000000处,成功后再输入“xfel exec 0x40000000”跳转到内核代码执行:
PS D:\开源项目\xv6\simpleos\kernel> xfel write 0x40000000 .\kernel.bin
100% [================================================] 4.063 KB, 292.707 KB/s
PS D:\开源项目\xv6\simpleos\kernel> xfel exec 0x40000000
PS D:\开源项目\xv6\simpleos\kernel>
如果一切正常,在串口终端上会打印“hello simpleos!”字符串:
评论